Hello and welcome to the next part in my ?how to? series for noobs like me on modifying the Xterra. In this one, I have installed a home fabricated, removable light bar. Again, I hope to go beyond an install and/or review by providing step by step instructions, insight, lessons learned, etc. My objective in doing this project was to build: an uncomplicated light bar assembly, it must be easily removable, keep the wiring easy to trouble shoot, keep the wiring out of the way of real mechanics and provide effective auxiliary lighting without re-creating the sun. Constructive criticism is always encouraged and welcome. Hopefully the pictures are a little better this time around! Oh, by the way. This will not show you how to drill the roof, as I just couldn?t bring myself to do it that way! And here is something to keep in mind.
If you leave your bar mounted all the time, measure the new overall height of your vehicle. A 7? 7? tall vehicle probably won?t fit well in a 7? tall garage!
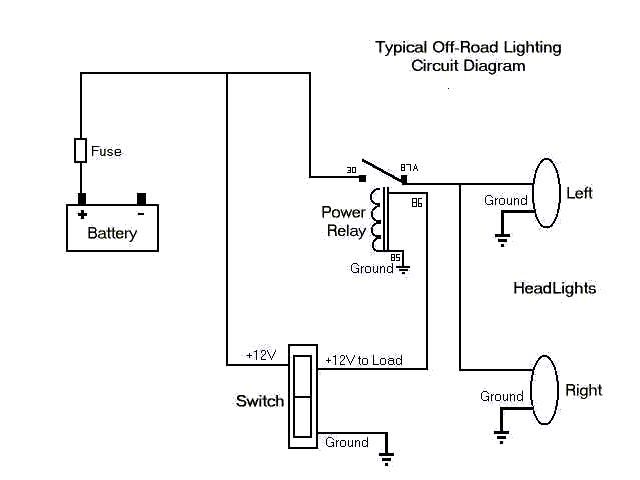
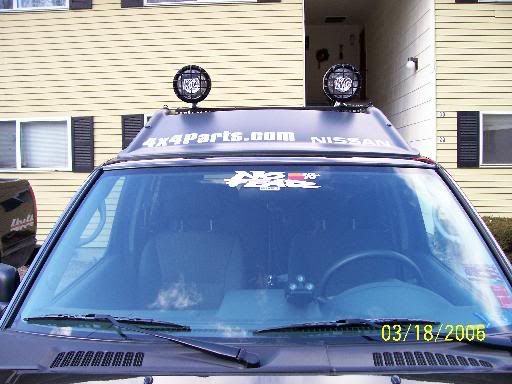
Creating and installing a roof mounted light bar
-Inventory the parts that come with your lights and make sure you read all instructions first!
-As always, here are the tools that I already had to work with and other items left over from a previous project.
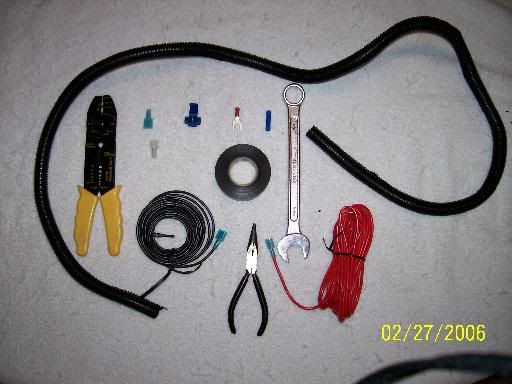
Wire cutters/wire strippers, auto wire conduit, red and black 14-gauge wire, various tips/splices/disconnects for 14-guage and the appropriate combination wrenches for mounting the lights particular to the lights you have selected.
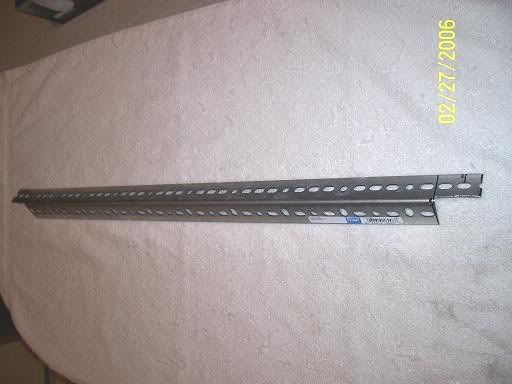
-Most of the parts you?ll see in the next few pics of the bar itself are readily available at your local hardware store. I chose a slotted, galvanized piece of ?angle iron?. It?s actually a firm steel that is bent to a 90-degree angle. Each slotted side is 1 ?? wide and the length is 48? (4 feet). There are many different ways to build a platform to mount your particular lights. This is simply the way I chose to do it. When you go to the hardware store, you?ll be asking for ?1 ?? X 48? galvanized finish slotted angle?
-I did not want a galvanized colored bar on top of my Xterra, so I looked into various types of paints, etc. For this project, I chose to try something different than paint. I used a product called ?Tite-Seal Rubberized Under Coating?. I have no idea how this is going to work over the long run so you may want to look into more traditional paints, etc. Make sure you measure and drill wider holes for the mounting screw of your lights before you paint the light bar!
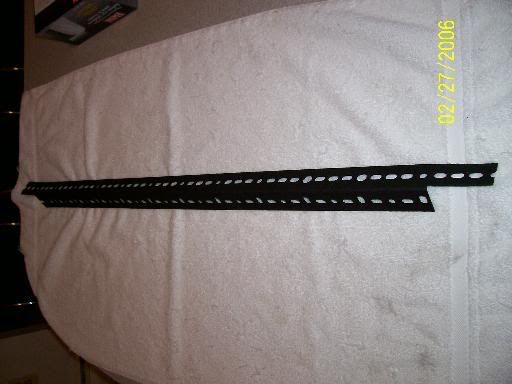
-As you can see, I cut the angle iron to length with a ?cut out? to go around the roof rack. I made sure that existing slots lined up exactly with the tie down screw of the basket. The same slots will work if you choose to use the top torx screws of the wind fairing as shown in the next picture.
-The lights I chose were ?Baja? brand lights that are readily available at your local AutoZone. They cost under $40.00 for the pair and they come with wire, connectors, splices, in-line fuse, a switch and wiring instructions. They are 100 watt, halogen lights that draw about 7 + amps. Because they are 100 watt lights, I also thought it best to use a relay. Again this is readily available at your favorite auto parts store. I chose ?cheap? lights as I will not want to go out and kill myself if I were to ruin them vs. $400.00 worth of lights while off-roading and hit a branch, bridge, whatever. Be advised, they do not come with enough wire to do this right. Plan on having extra 14 gauge wire available.
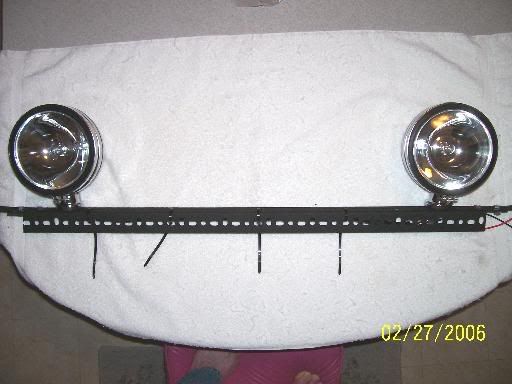
Lights on bar, wired up and showing cut-outs for the roof rack
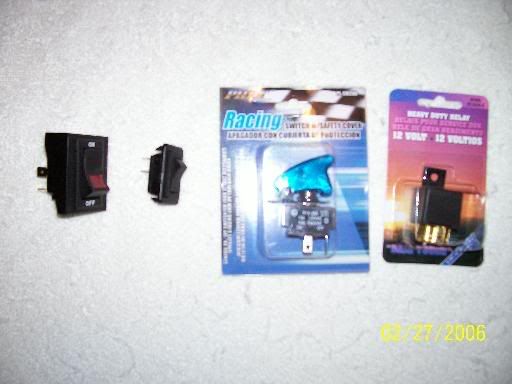
Example of relay and various switches
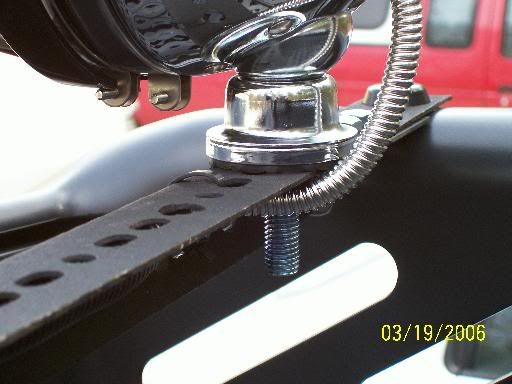
-After cutting/drilling the angle iron, applying whatever finish you chose, etc., mount the lights to the bar and begin to wire them per the instructions. Do not tighten the nuts on the lights all the way. Remember, you?ll be aiming them to your liking after dark. Then you tighten the nuts all the way to lock them into place. Coming out of the back of my lights were, you guessed it, red and black leads. Red, of course is your powered line and black is for running them to a grounding point. I chose to run the ground wire down the ?a? pillar along with ?hot? wire and ground the lights to a point in the engine compartment. Pick whatever way is best for you. The important thing is to remember to make sure all connections are solid and that the ground ends in metal to metal contact. You can do everything right but if the lights are not grounded properly, they won?t work. Cut the appropriate length of red and black wire from each roll to splice the red and black leads from the lights in to one wire (one connection is all black and one connection is all red) Measure twice, cut once!
Courtesy of Jeffrey a.k.a. ?Rockaholic? of NEXterra.com
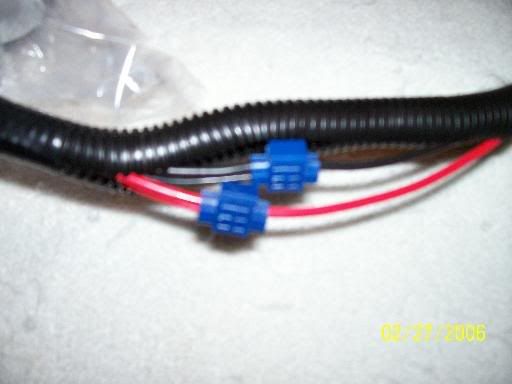
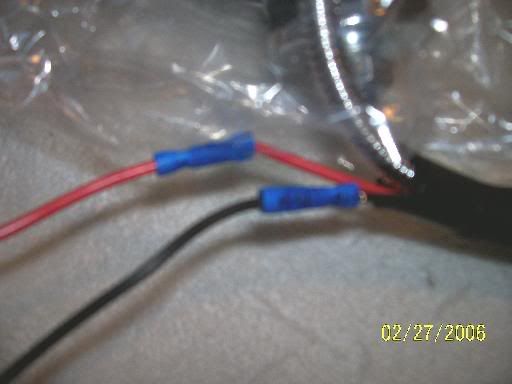
-I terminated the wires from the light bar with female quick disconnects. Other people have used the connections from trailer lights to make their quick disconnect. It?s a matter of personal choice.
-Take the loose end of the red and black wires and anchor them to the roof rack. Always leave a little extra wire to allow for improper measuring. Remove the torx screws from the wind fairing and run the wires along the roof rack until it meets the roof at the rain channel. (see pic below) Zip-tie the wiring in place. Replace the wind fairing.
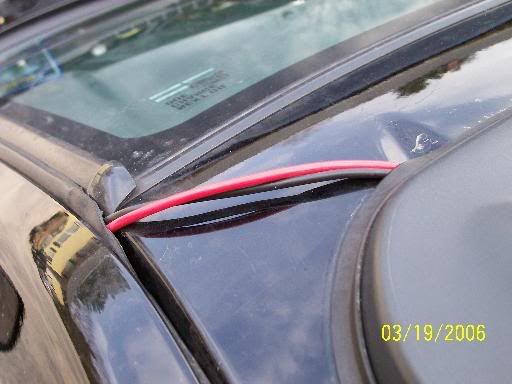
After running the wiring along the roof rack and ending at the roof
-Stretch out and straighten your roll of wire. I ran the wiring into the engine compartment by running it down the ?a? pillar along the channel between the metal and the weather stripping. The weather will pull out of it?s channel to make this easier. (BE GENTLE). Once the wires are run in the channel, anchor them in place by replacing the weather stripping. A flat head screw driver will come in handy for this. (Again, BE GENTLE)
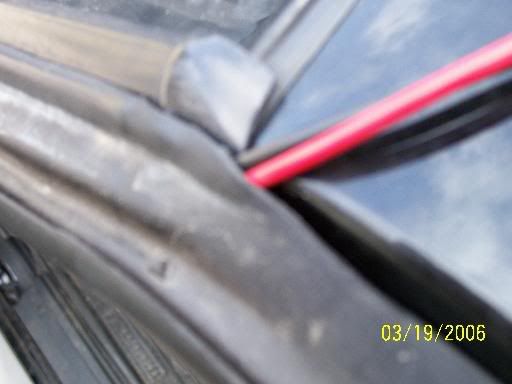
Wiring entering the weather stripping
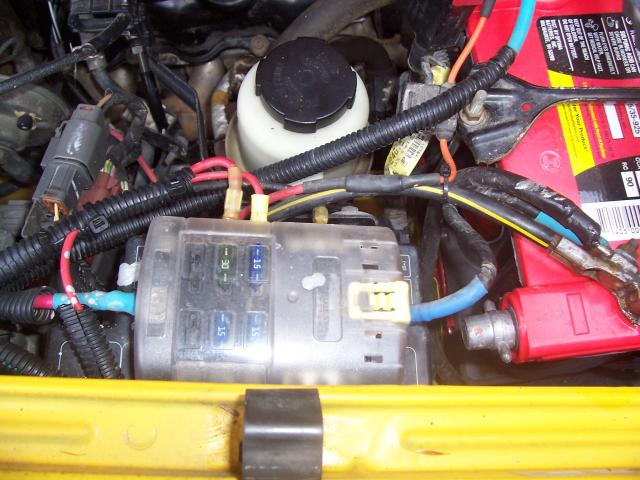
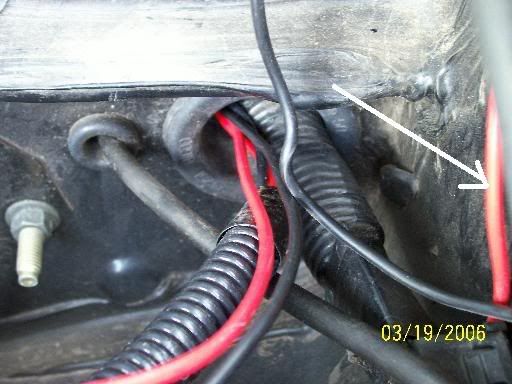
-there is a small channel to run the wiring along between the fender and window sill. There is enough room to get both wires through but I would pull one through at a time until your wiring is now in the engine compartment. In the picture below, you can see two things. First, at the white arrow, is where the wiring will come out if you have run it properly in to the engine compartment. I apologize up front for forgetting to take a better picture to show how the wires come into the engine compartment. Secondly, it shows where I ran the wires through the firewall to get to the switch. There is a large rubber grommet where a factory wiring package goes through. The picture is looking into the engine compartment so that the steering wheel is right on the other side of the wall.
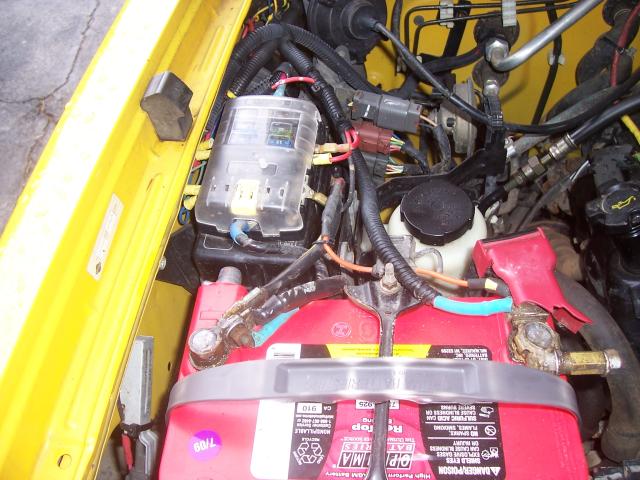
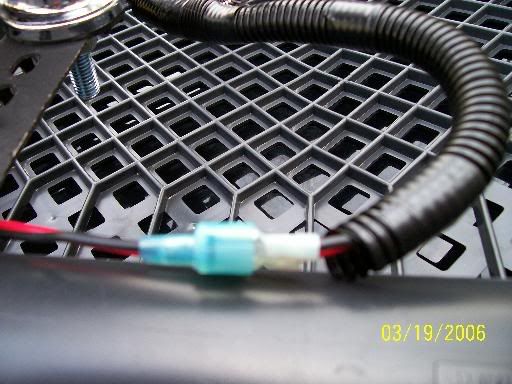
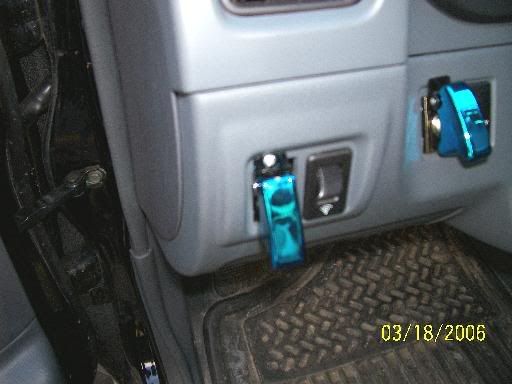
-I won?t pretend to tell you the best way to run wiring in the engine compartment. You can determine this on your own. I ran mine along the firewall on top of some A/C piping to keep it out of the way. All of it is inside the flexible wiring conduit pictured as part of the tools and supplies needed near the top of this article. You can see some of the conduit in the picture below. You can also see where I mounted and ran wiring to the relay. Also visible is the splice showing the red wire leading from the switch being spliced to the wire running to the battery. Additionally, you can see the in-line fuse that is placed between the relay and the battery.
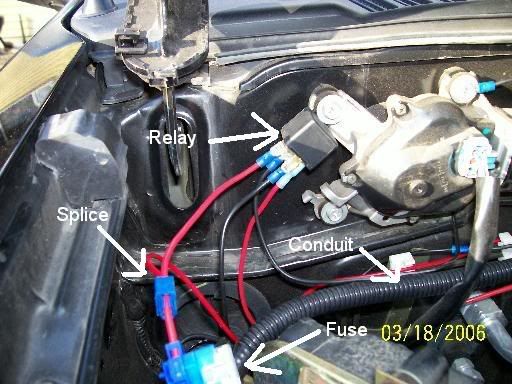
-How you run the wire to battery is a matter of personal choice. I continued along the passenger front fender and ran it to the battery while protecting it in conduit and zip-tied in key places. Don?t forget that the relay must be grounded too! Do not hook this wire to the battery until the rest of your circuit is complete, you?ve checked all connections and grounds and your light bar is connected. Make sure your on/off switch is in the ?off? position before hooking to the battery. Speaking of switches, I used toggle switches with safety covers. Again, these are readily available at AutoZone,
www.Autobarn.com, etc. They come in different colors, including black. I chose the blue just for a small touch of ?bling?.
-Once you?ve checked everything thoroughly, hook your final wire to the battery. Keep an eye on your wiring and your in-line fuse. If there is a short in your circuit, this should burn first and prevent damage to your lights or wiring. Should the fuse blow, unhook from the battery. Go through and check that all of your connections are clean and replace the fuse. Correct any problems found. Hook to the battery. If the fuse doesn?t blow, try turning your lights on. If the light turns on, you are done and congratulations! If they don?t, unhook for the battery and double check your grounds. Correct any problems found. Hook to the battery and try again. They should work. Taking your time and making your splices and connections right the first time will help ensure success when you turn them on the first time! I have not had a problem yet after two wiring projects by taking my time.
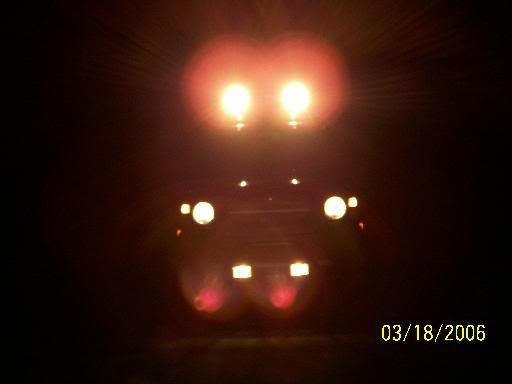
-Once again, I hope someone finds this helpful. As always, if you are a ?noob? like me, I would plan on 2 to 3 hours of install time, not including painting the bar and drying time. So far, I have found the mount steady and no issues at highway speeds. I?ll be checking it off-road tomorrow and will edit this article to reflect the results.
-Update on 4/5/2006- I've had the light bar on all week to see how it does being left on in the weather, etc. and I'm very pleased so far. The connections are not as quick to disconnect as I would like but had no issues with water getting in during a downpour and then an unexpected snow storm. I've been down several dirt roads that are still potholed from the winter and the lights remain steady and on track while bouncing down the road.
As always, please feel free to contact me should you have any questions.
Barry

 Board index » Tech Talk » Installs/Reviews


 and great details.Speedy made me a light bar for my X a couple years ago.